How to Make a Video File Smaller on Mac

When you make or edit a video, the result is often quite massive. Sometimes, these files take up much too much room on your Mac, pulling away too much of your storage. If you need to share these videos, they are also nearly impossible to send via email or social media due to their size.
If you want to learn how to make a video file smaller on Mac computers, you can use the information below. There are a variety of built-in software types and third-party services available to you. These are both free and paid, depending on the option you choose.
Built-in Features
Many creative professionals love to use Mac computers because of the many built-in editing features that exist. Some of these allow you to learn how to compress a video on Mac for email sharing or social media. Learn more about the variety of options available below.
Apple iMovie
Apple iMovie comes pre-installed on every Mac. It is free to use too so that you can learn how to compress a video for Whatsapp or any other social media site. Use the steps below to get started.
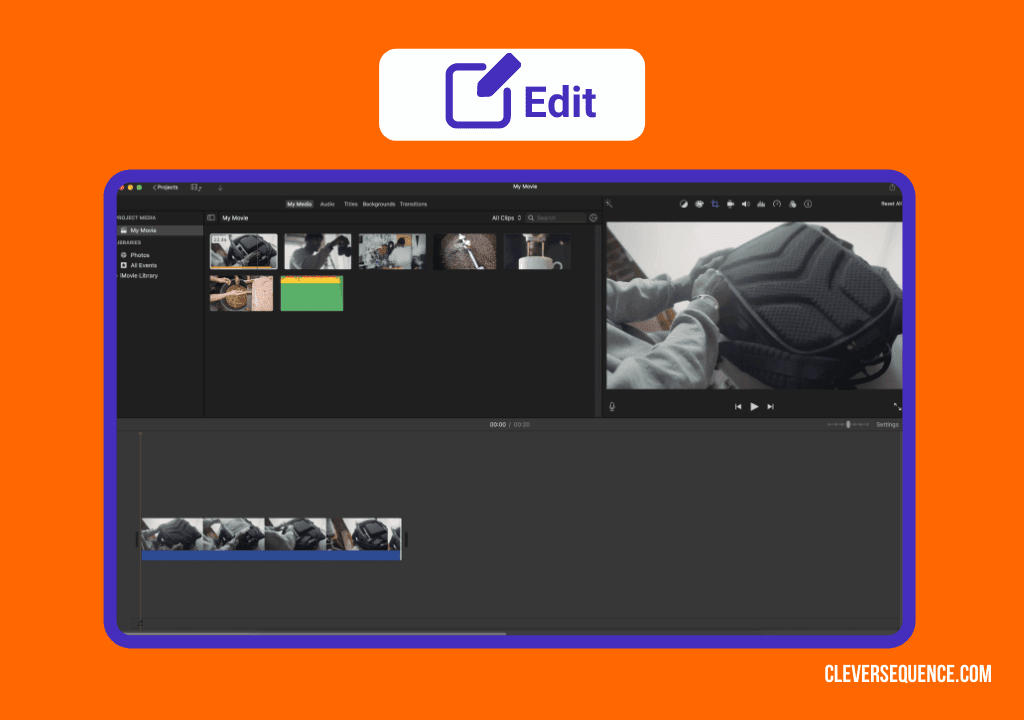
1. Open iMovie.
2. Press the plus sign to import your video.
3. Drag and drop the appropriate media to the timeline.
4. Complete any necessary edits, and get ready to export your movie.
5. Click on “Share,” then press “File.”
6. Lower the resolution of your video to make the file size smaller than 500 MB.
7. Ensure that the field labeled “Quality” is still set to “High.”
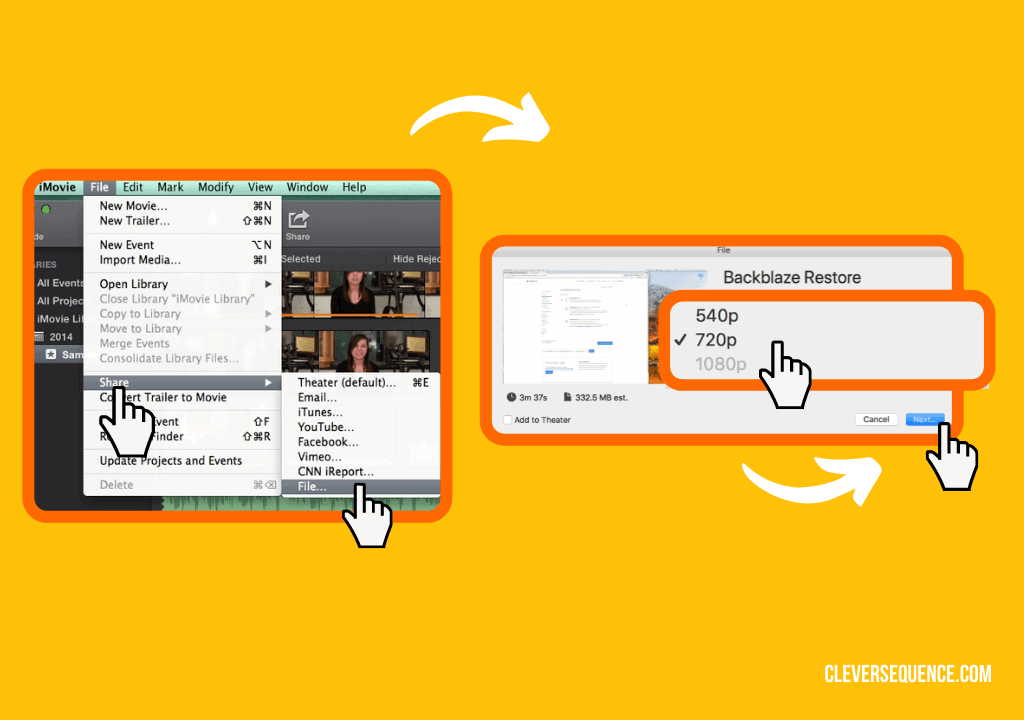
8. Press “Next” and give your video a title.
9. Click “Save.”

Compress A Video Using Email
If you want to learn how to compress a video on Mac for email, you can use other settings on iMovie. The steps regarding this process are below, but they will begin with the exporting settings.
- After finishing the editing of your video, click on the “File” menu.
- Select the “Share” option and press “Email.”
- Choose “Small” to reduce the file size.
- Send an email to yourself or to a loved one using the field provided.
- If you send the compressed video to yourself, download it from your email.
Turn a Video into a Zip File
Turning a film on your Mac to a zip file is a great way to learn how to compress video files on Mac without losing quality. This method will only slightly compress your media, however. You can learn how to complete this process using the steps below.
- Open the Finder app, and locate your video.
- Right-click on the video file.
- Select the “Compress [File Name]” option.
- Wait for the conversion to finish.
Reduce Video Size with QuickTime
QuickTime is a movie player app that comes with every Mac. When exporting a film from QuickTime, you can learn how to compress a video for Whatsapp or any other social media. You can double-click on your file to open QuickTime or use the steps below to start.
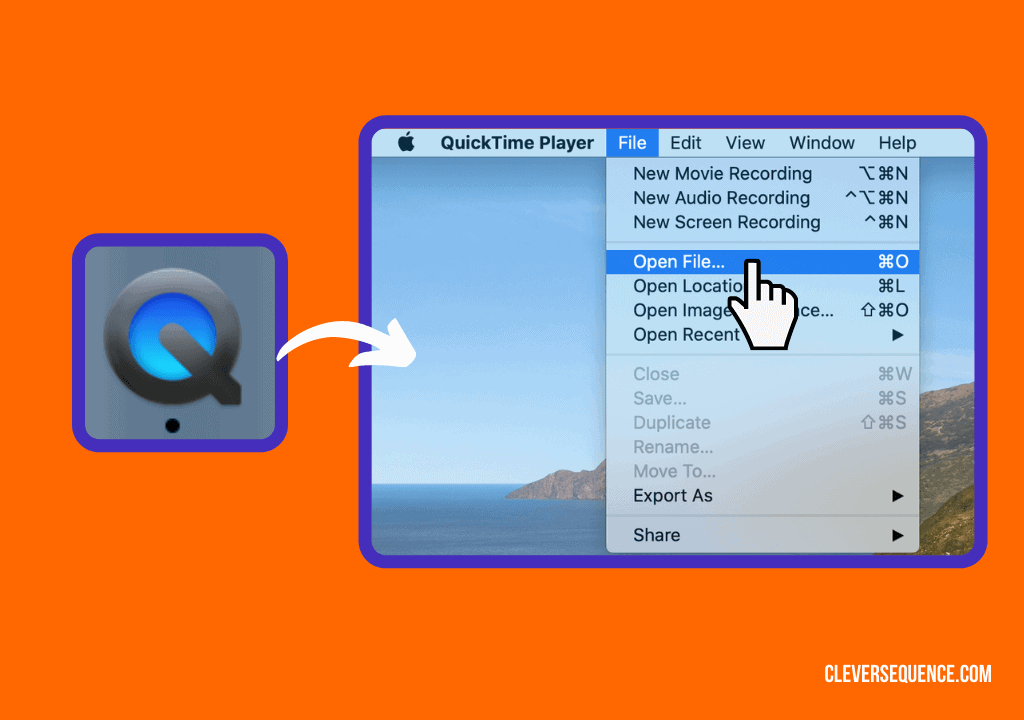
1. Open QuickTime.
2. Click on “File,” then press “Open File.” Locate the video you need to compress.
3. Click on the “File” menu again, then press “Export as”
4. Select one of the lower resolution options.
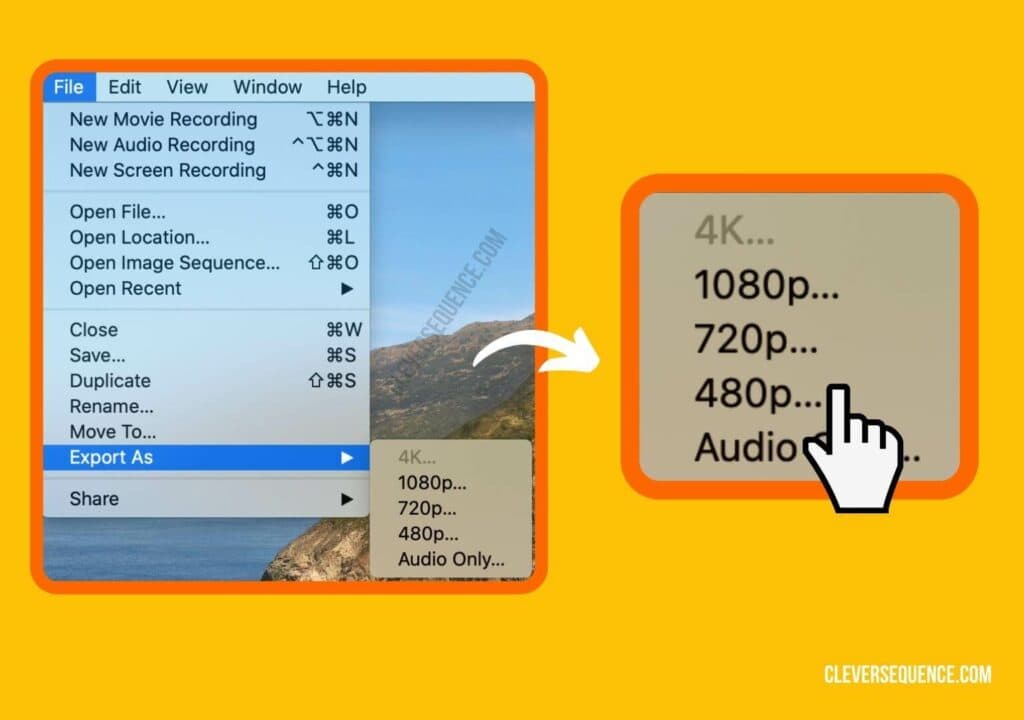
5. Checkmark the “Use HEVC” option to keep your video high quality.
6. Name your video and press “Save.”

Use VLC
VLC is another media player that comes with any Mac device. It is free to use and has compression features. Learn how to make a video file smaller on Mac using this tool in the steps below.
- Open VLC.
- Click on the “File” menu, then press “Convert/Stream.”
- Drag and drop the appropriate video to “Drop Media Here” section.
- Under “Choose Profile,” select a smaller video format.
- Click on “Customize,” and adjust the bitrate, frame rate, and resolution.
- Press “Apply.”
- Click “Save,” and choose the location for the file and the name of it.
- Press the “Start” button, and wait for the compression to complete.
Third-Party Software Where You Can Compress Videos on a Mac
The built-in features on Apple computers are extremely user-friendly. Sometimes, however, there are not quite as many settings as you would like. To find a more detailed tool that will show you how to make a video file smaller on Mac computers, consider those below.
Adobe Media Encoder
If you sign up for Adobe, you can learn how to compress video files on Mac without losing quality using Media Encoder. This software is one of the few that is free with the company, but it is high-quality. Learn how to make your video smaller using the steps below.
- Download Adobe Media Encoder from the Creative Cloud.
- Open Media Encoder and import your video files to the app.
- Under “Presets,” look for an option with a lower resolution, and apply it.
- Use the H.264 option if there is no other available to you.
- Choose the file location and title of your new video.
- Press the green arrow to start the process, and wait for your video to save.
When learning how to make a video file smaller on Mac computers using Media Encoder, you will retain a copy of the original. If you want to perform further edits, open either in Premiere Pro.
Adobe Premiere Pro
You can learn how to make a video file smaller on Mac computers using Adobe Premiere Pro too. This software is only available with a paid subscription to Adobe, however. Follow the steps below to learn how to make a video file smaller on Mac computers using this tool.
- Open Adobe Premiere Pro.
- Import your video.
- Click on “File,” then “Export,” and “Media.”
- Under file format, choose H.264.
- You can also set the bitrate to “VBR, 2 pass.”
- Lower the bitrate slider, paying attention to the quality in the preview section as you go.
- Reduce the resolution of your video or change the frame size.
- When you complete your edits, press “Export.”
Handbrake
Handbrake is one of the most popular tools available to learn how to compress video Mac free. It is user-friendly, as seen in the steps below.
- Download Handbrake from www.handbrake.fr.
- Open the Handbrake application after it downloads to your Mac.
- In the pop-up, locate the video you need to compress. Press “Open.”
- Look for the drop-down menu labeled “Presets,” and select a smaller option.
- In the field labeled “Save As” towards the bottom of the screen, type in a new title.
- Select a file location to save your video.
- Press “Start” at the top of the screen. The video will automatically save to your computer.
Shotcut
Shotcut is technically a video editor, but you can use it to compress video Mac free. The steps are not as obvious as those for other tools, however. Learn how to make a video file smaller on Mac computers using this third-party software in the information below.
- Download Shotcut from www.shotcut.org.
- Open the Shotcut app.
- Click on “Open File,” and locate your video.
- When you complete edits, click on “Export” on the top right corner of the screen.
- Select H.264 if you want to keep the quality while reducing the size of your video.
- Adjust the “Resolution” and “Aspect Ratio” fields to make your video even smaller.
- Press “Export File.”
If you choose to adjust the resolution when using this free video compressor, you will have to change both the vertical and horizontal numbers. Shotcut will not do this for you automatically.
Permute
Permute does cost money if you want to use it to learn how to compress a video for WhatsApp, for instance. You can change your videos to any file format. Use the steps below to test out Permute for yourself while you are still on the free trial.
- Download Permute from www.software.charliemonroe.net/permute/.
- Open the app, and drag and drop the video to it.
- Click on “Settings,” and adjust the “Bitrate” and “Resolution” fields.
- Adjust the file format to MP4.
- Press “Start” and wait for the video to download to your computer.
CameraBag Pro
CameraBag Pro does not only edit videos, you can also work on your photos. This software was once the runner-up for Mac App of the Year. It is simple to use, even when you want to learn how to compress video files on Mac without losing quality.
- Download CameraBag Pro from www.setapp.com/apps/camerabag-pro.
- Open the software and drag the video to the app.
- Click on the “File” tab, and press “Save As.”
- Lower the resolution, choose H.264 as the file type, and ensure the quality is still high.
- Press “Save.”
Wondershare UniConverter
To learn how to compress a video on Mac for email or other sharing methods, consider using Wondershare UniConverter. This software comes with a free trial, but you will have to pay when that expires. Use the steps below to compress your videos.
- Download Wondershare UniConverter from www.videoconverter.wondershare.com.
- Open the program on your Mac, and go to the “Video Compressor” tab.
- Click on the icon with a plus sign to add videos to the app.
- Press the “Settings” icon next to a video.
- Adjust the file size, bitrate, format, and resolution. Press “Ok.”
- Look for the drop-down menu next to “File Location,” and select the folder where you want to save your videos.
- Press “Start All” and wait for the compression to complete.
Websites for Reducing Video File Sizes
If you want more ideas for a free video compressor that you can use to reduce the size of your media, consider online tools. Some of the best are below.
VEED
Veed is an online, free video compressor that you can use if you do not want to have to take up valuable storage space on your Mac. You can even connect your Dropbox account to the website, uploading it directly from the Cloud. Use the steps below to learn how to make a video file smaller on Mac computers using this website.
1. Go to the browser and enter www.veed.io.
2. Press the blue “Upload Your File” button or connect your Dropbox.
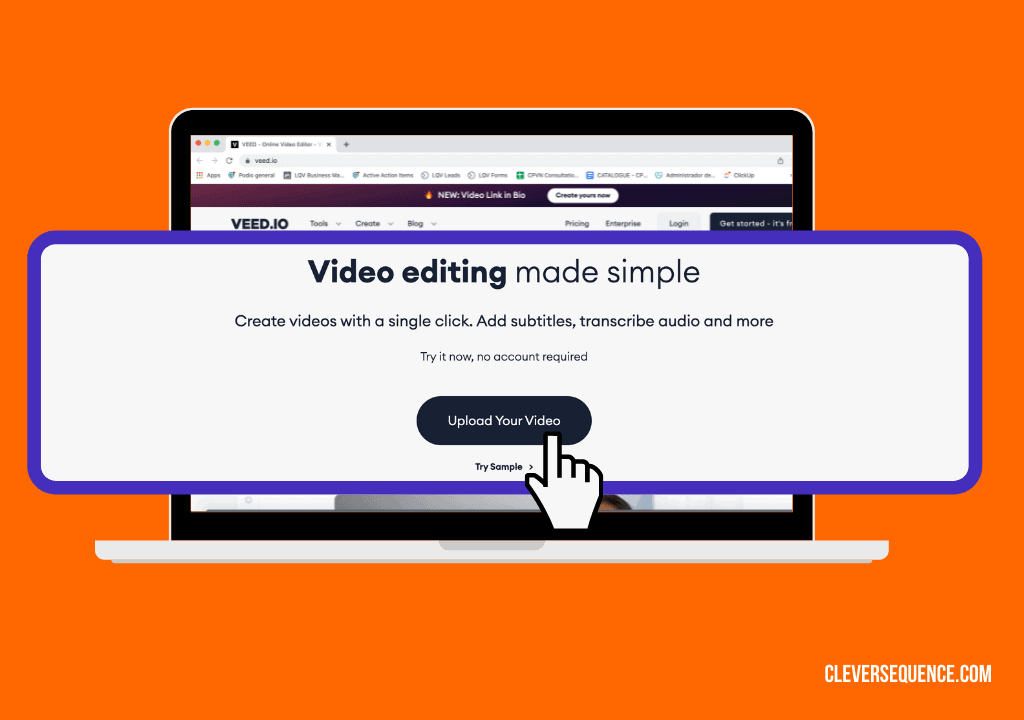
3. Let VEED automatically set the best compression options. You can also manually adjust the quality and resolution as you need it.
4. Press “Export,” and wait for the process to finalize.
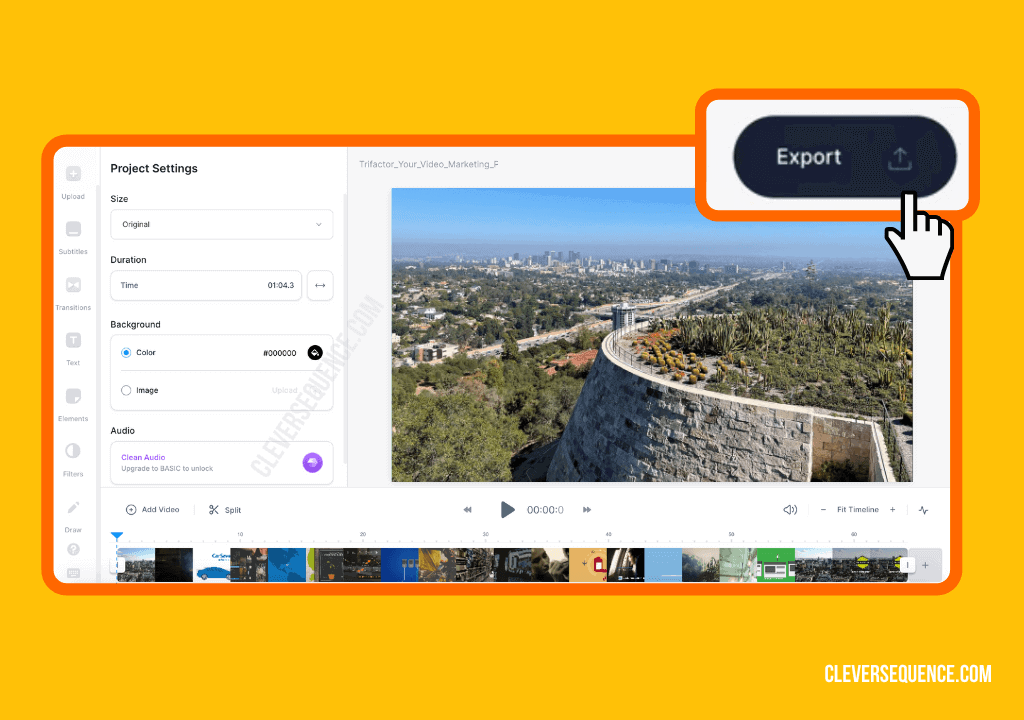
5. Click on “Switch to Advanced” and then “Export Video” to save your new video file to your Mac.

VideoSmaller
You can also learn how to compress video Mac free using VideoSmaller. This tool will keep your film high-quality and is completely free. Learn how to use this tool in the steps below.
- Go to your browser and enter at www.videosmaller.com.
- Click the “Browse” button and upload your video.
- Check the checkbox next to the “Use Low Compression Level” phrase.
- Press “Start Now.”
- Download your new video after the compression process is complete.
VideoSmaller also has options to let you remove the audio from your video. You can also scale the width of your film using the provided tools.
Clipchamp
Clipchamp is free to use and completely online. Your film will have a watermark on it with the unpaid version, however. Learn how to make a video file smaller on Mac computers using Clipchamp in the steps below.
- Navigate to your browser and type in www.clipchamp.com.
- Log in to your account.
- Drag and drop a video into the browser.
- Go to “Compression Settings,” and enter the quality, resolution, and file format.
- Press “Start.”
- When the process completes, press “Save.”
Clideo
Clideo is a free video compressor that will only work if your film is already under 500 MB. Learn how to compress your files using this tool below.
- Go to www.clideo.com.
- Press “Compress, then “Choose File.” Upload the appropriate video.
- Click “Edit Result” until you are happy with the finalized product.
- Press “Download” to save the new video.
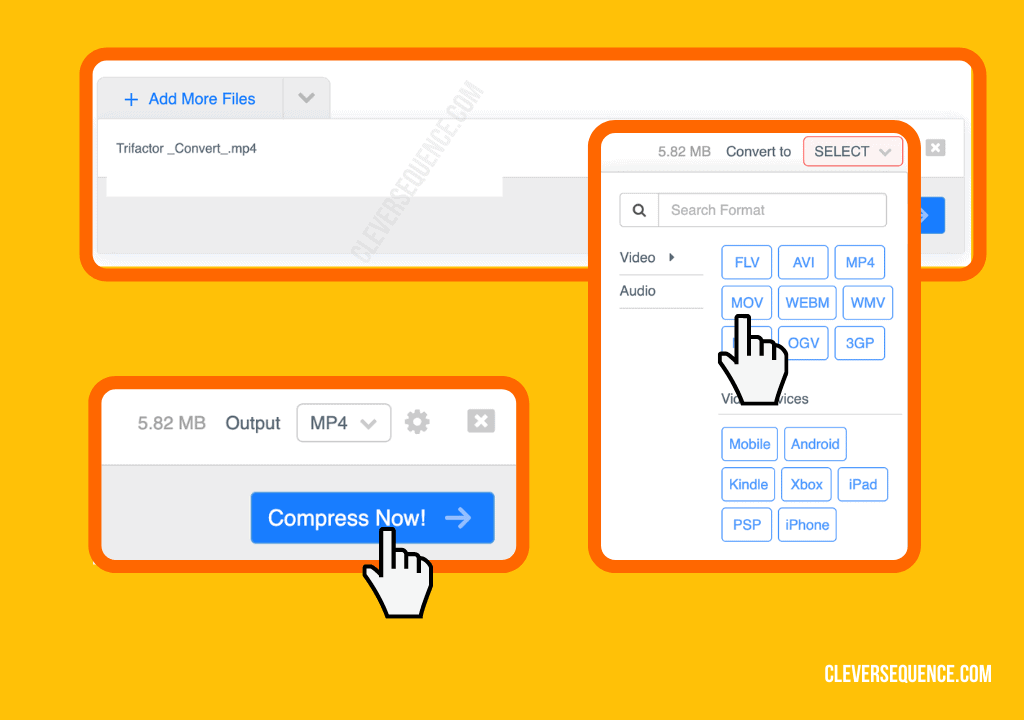
Free Convert
Finally, Free Convert lets you work on any video that is less than one GB in size. Sometimes, however, users state that the quality goes down after learning how to make a video file smaller on Mac computers using the steps below.
1. Go to www.freeconvert.com in a browser.
2. Go to “Choose Files,” then “Select the File.” Find your video, then press “Upload.”
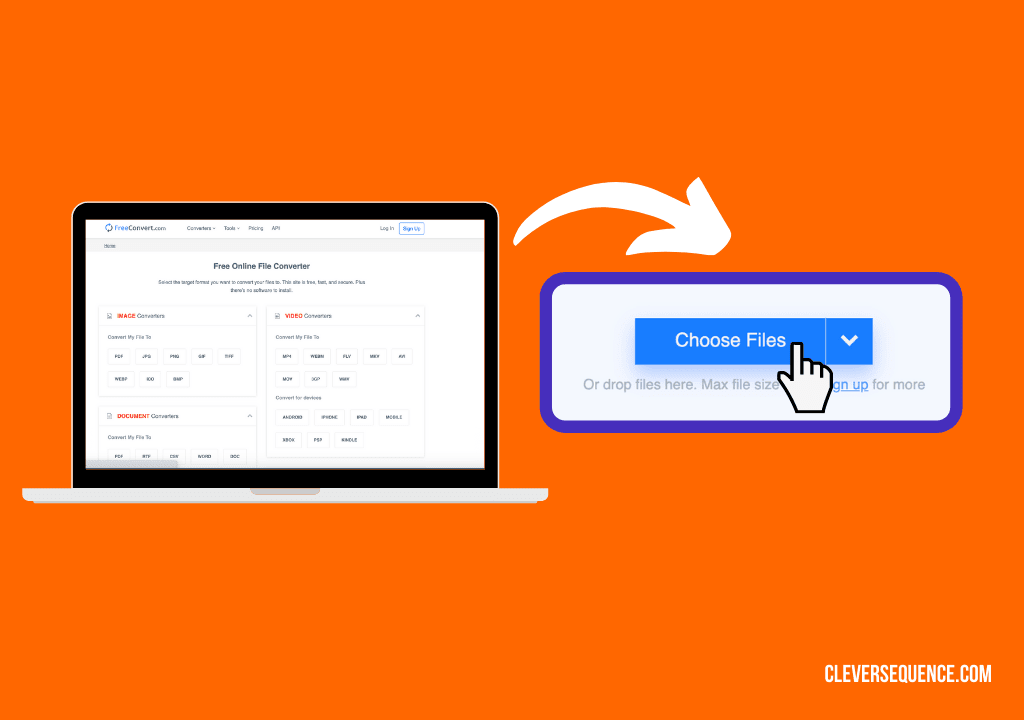
3. Adjust the “Output Settings” to compress the video.
4. Press “Compress Now.” After, download your video.
Compress a Video on a Mac
If you want to learn how to make a video file smaller on Mac computers, use the endless options available. Quicktime, VLC, and iMovie come included on your device so that you can make basic edits.
If you need more detailed tools, consider one of the many third-party apps listed above, including Wondershare UniConverter and Handbrake. There are other web-based options if you do not want to take up storage space on your computer.
The above article may contain affiliate links, which help support Clever Sequence